Using One Light
Using artificial light can make a huge difference to your images, and therefore your appeal to potential clients. And yes, I can hear you, Thomas, and your “I only shoot ambient”.
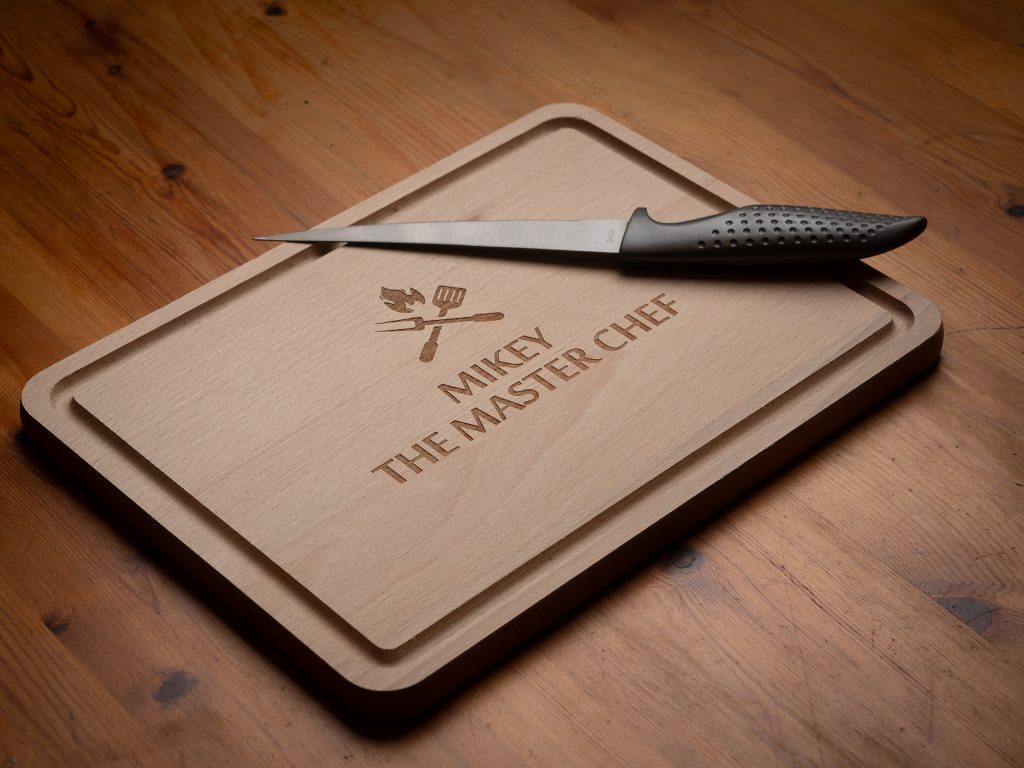
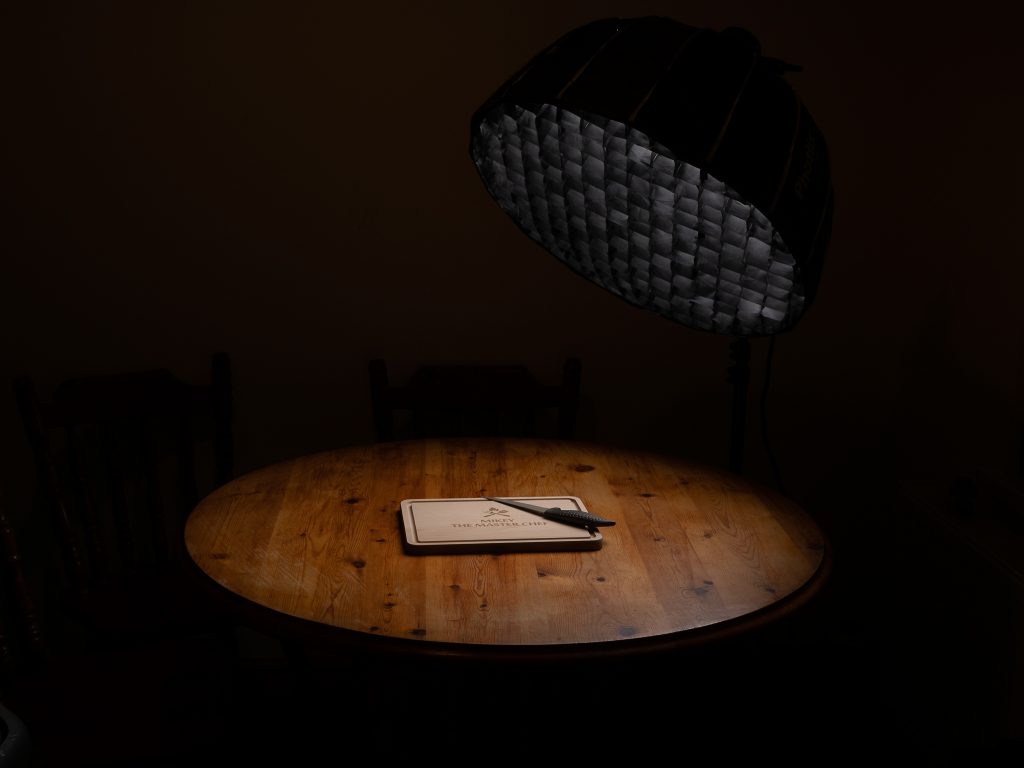
Ambient is great, if the light is exactly as where you want it to be, in the right direction, at the right intensity and at the right time of day. But lets start off with something really simple, such as the above product shot. I wanted to provide quite a soft ethereal look to the board, with a single directional light. The technique here was to have the light opposite the camera, quite high, and angled down towards the board. This would obviously cause the light to reflect from the lighter wood of the cutting board, and the angle of incidence meant the light would reflect directly towards the camera. Using an ISO of 200, a high shutter speed of 1/250th sec to cut down any strenuous light from the room, and an aperture of f5.6 to expose for the reflected light, rather than the frame as whole, gave us a well exposed board. The table is basically under exposed, which fixes the viewer’s attention on the cutting board itself.
The light is an ELB500, firing through a Phottix Raja 65 heaxabox with a honeycomb fitted. The honeycomb helps ensure the light is tightly controlled, and we get no bounced light from any walls in the room. The light output was set to 0.1 (Equivalent to 7Ws).
This is the pulled back shot, showing the position of the softbox, in relation to the chopping board, and you can see the angle the light is directed downward, and how that light would be reflected from the board towards the camera.
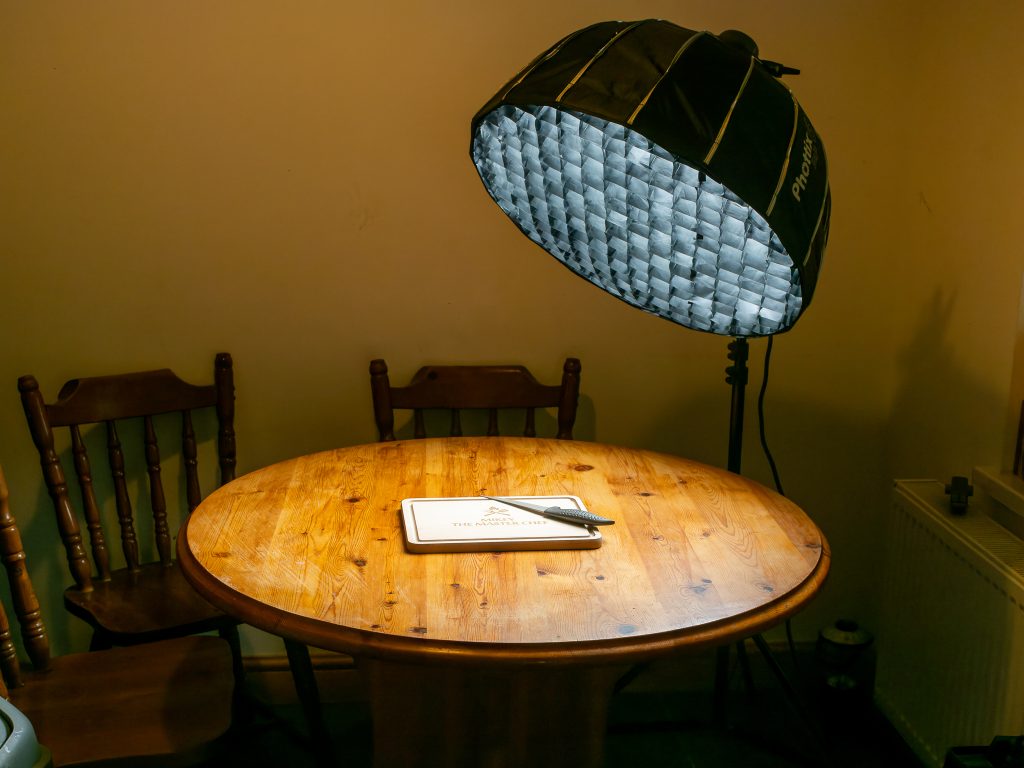
This is the same previous image, but with the exposure pulled up in post production, allowing you to see the closeness of the wall that could easily have reflected any bounced light back onto our subject. Any bounced light would have taken away a lot of the atmosphere of the image.
This technique is often referred to as a Focused Diffused Lighting (FDL) technique, and is often seen on high end automotive imagery. That said, the same technique can be used to good effect in any number of other genres.
Now, if you are sat there thinking “Yeah, I don’t have location kit”. Well, to be honest, this image can easily be achieved with a speedlight. The ELB500 was only set to an output of 0.1, equating to 7Ws. Most speedlights tend to have a maximum output of something like 75Ws at full power. Therefore half power would be 37Ws, quarter power would be 18Ws and eighth power would be 9Ws, which is good enough for this shot.
“I don’t have a softbox for my speedlight!”. Well, there are any amount of speedlight dedicated softboxes, and also adaptors for speedlights to studio softboxes too. However, for this particular image, why not be creative. All you are wanting to do is tightly control the light. Have you an empty toilet roll? Or similar?
Just tape it to the front of your speedlight and trim it back a little (probably take about a quarter off the length, at a guess). You will find the tube will act as a snoot, and control the light nicely. Set it up in position, and then have a play. Start with a decent shutter speed, such as your maximum sync speed. Choose an ISO of 200 and the start with a wide open aperture and take a shot. Increase the aperture value for each subsequent shot till you are happy with it.
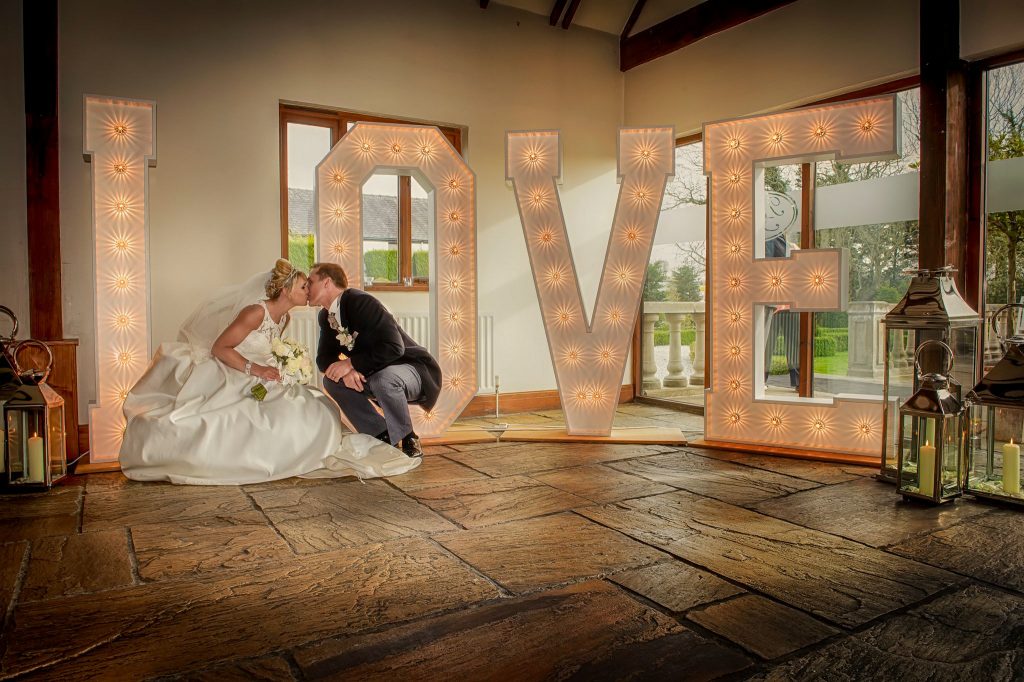
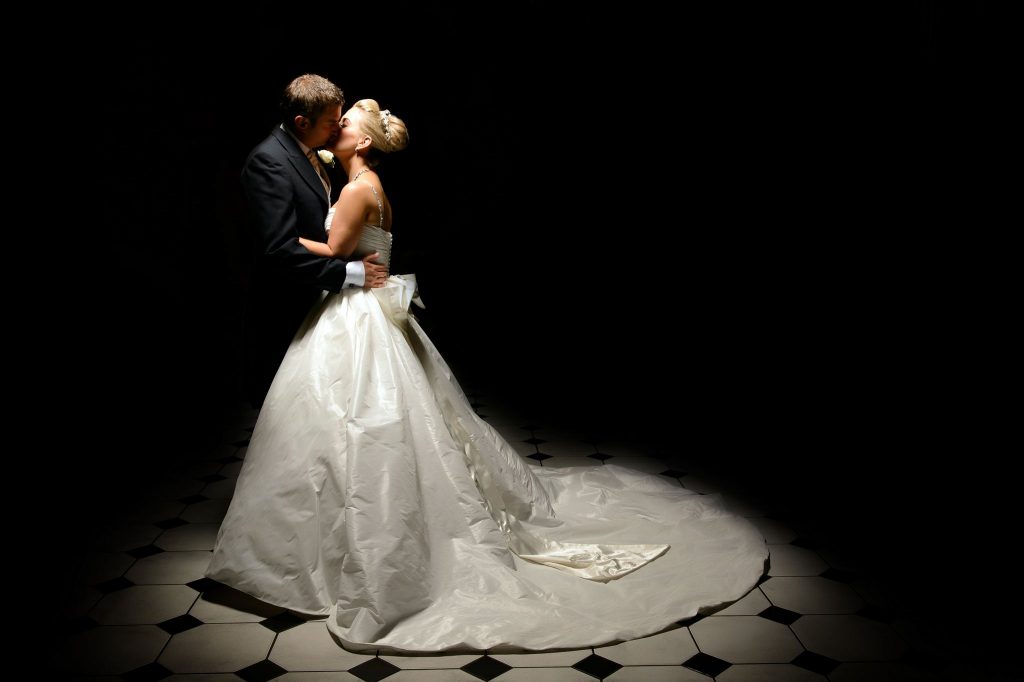
Staying with speedlights, this image was a very simple single speedlight with a reflector, and set to a manual output of a quarter. It was placed lower down and frame right, so as to act as fill for the bride and groom. If you look carefully, you can see the pattern on one of the floor tiles front frame left, has caught the light, which gives away the position of the speedlight. The reason for quite a low output, was down to the fact I was exposing for the light within the letters, so as to retain detail and the ambience of the whole scene, but the bride and groom lacked detail, as a lot of the light was coming through the window, the couple were under exposing on my side.
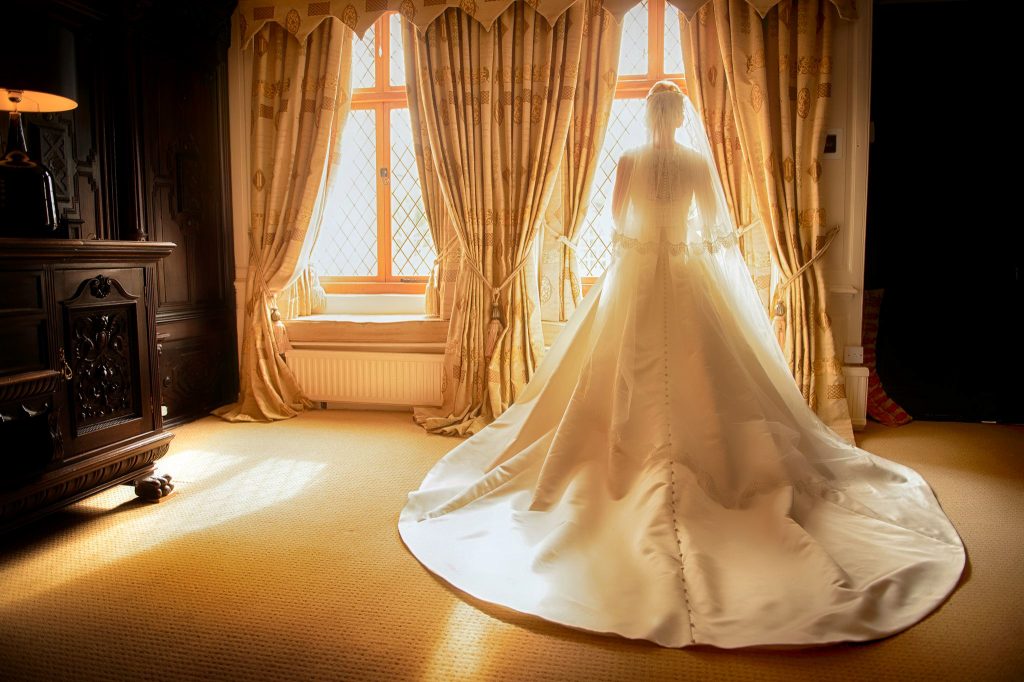
Another speedlight image, and from the same wedding. I liked the light coming through the window, especially as it gave quite an ethereal look to my bride as she looked through it. However, most of her dress had become silhouetted, which meant there was a distinct lack of detail. This was cured with the speedlight mounted on the camera, at an output once again of a quarter, which gave just enough light to fill the dress and lift the detail, without filling the corner of the room. The camera was set to 1/60th sec ISO400 and f2.8
Still staying with speedlight only shots. However, this time I’ve added a honeycombed folding softbox (80×80) and a handheld boom. This was taken in a hotel reception (Check out the tiles!), and the lights were on, and it was about as cluttered as you would expect for a hotel reception area.
Using the honeycombed softbox would restrict the light to quite a small pool. The camera was set to 1/200th sec ISO 100 and f5.6, which was enough to overcome the light in the hotel, and the speedlight was initially set to half output, but it blew out a lot of the detail on the brides dress. It was then reduced to a quarter output, and that sorted it.
This was a single softbox, using an ELB500, and as you can see from the shadow behind our bride and groom, it was positioned alongside me and fairly high. The output of the ELB500 was set to 4.0, equating to 100Ws. A speedlight would struggle here, although you could open up the aperture a little to compensate. 1/320th sec ISO200 f8
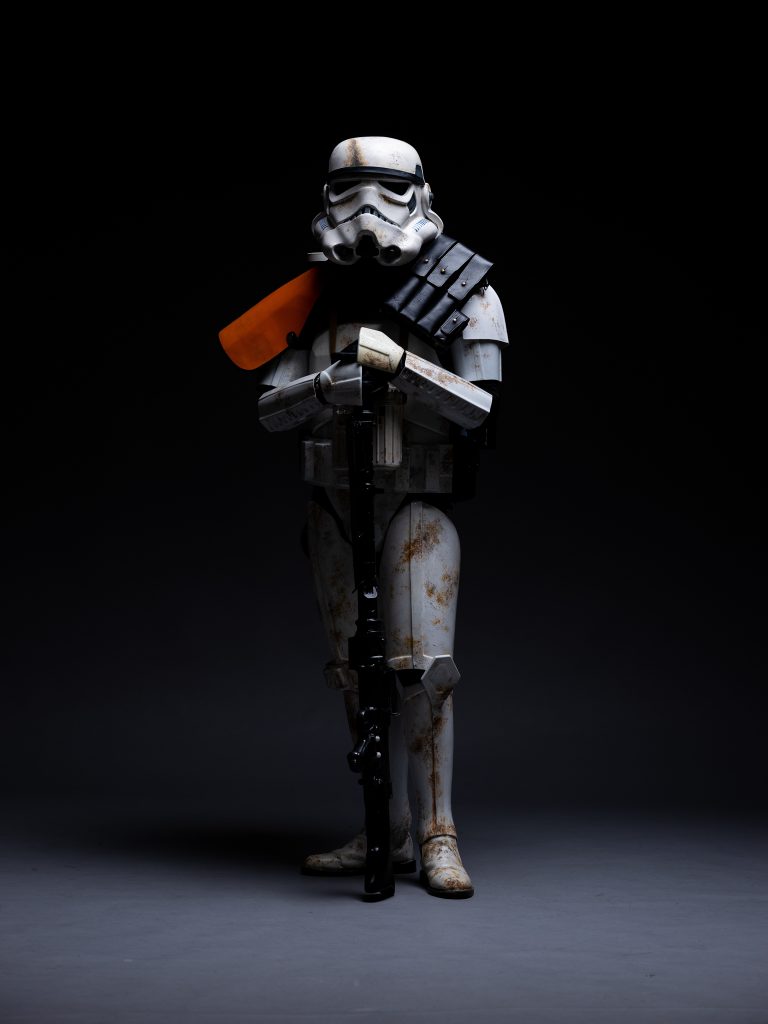
I wanted to mimic the starcruiser corridors, as seen in the Star Wars films. Although I wanted it to be potentially moodier and darker perhaps. I used an overhead lightsource, as used in the filmsets. I boomed an Elinchrom ELB500, which is absolutely ideal for boom work, as the head weighs pretty much nothing, and the only additional weight is the EL adaptor (allowing standard Elinchrom mods on the tiny ELB500/quadra heads), and the softbox itself. In this instance, I went with a 150cm Octa combined with a honeycomb. The size of the Octa meant there would be a good spread of light, whilst well controlled by the honeycomb. It meant that an individual subject could stand almost at the edge of the pool of light, with the width of the light source giving a very nicely diffused spread along their full height.
The output was set to 3.0 (Equivalent to 50Ws). The reason for the low output was down to a few things. The light source itself was barely out of the frame, and the costume is extremely glossy white, so the light was very easily picked up. And finally, I was using an ISO of 400, but caught the command dial inadvertently, dropping the ISO to 320.
1/125th sec ISO320 f5.6
There’s a full walkthough of the above shoot here.
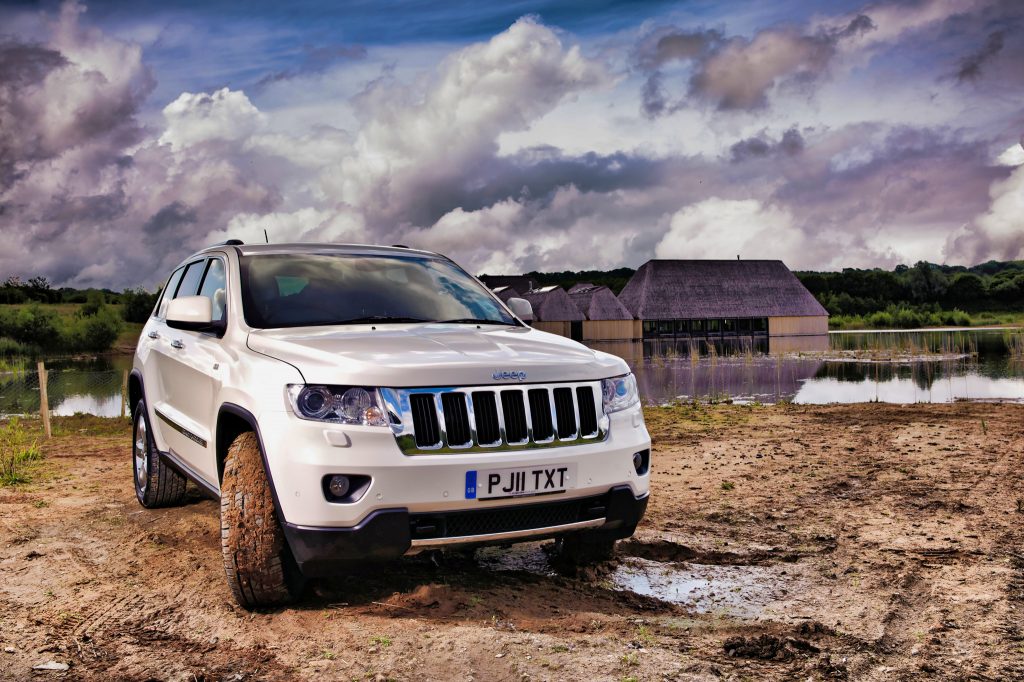
This image is quite old now, as it was commissioned for the launch of the new Jeep in 2011. The main light is the sun, which was frame left, and the front of the vehicle was in shadow. I simply used a 70cm beauty dish and a location light to fill in the front of the vehicle, just enough to get it to match the ambient levels.
Even with just one light, you will find it can make a vast difference to your images, and your appeal. But be warned. It’s quite addictive, and you will soon find yourself lusting after more lights and modifiers.
Which can only be a good thing, right?
I need to impress that on my Mrs.
The ELB500 lights came from The Flash Centre.