This is Martins Arbidans, a long time friend who often steps in as a model when asked politely. On this occasion, Martins modelled for a lighting course held at Studio Sphere in Nelson.
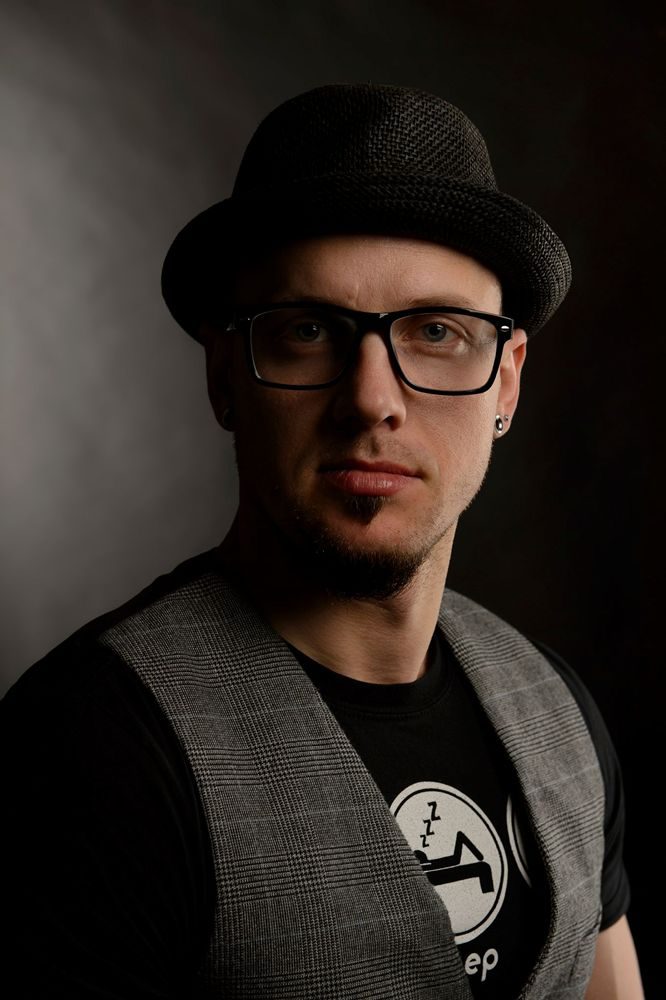
The course started with the basics, gradually progressing to demonstrate various lighting styles with regards to product and portraiture. The above technique is known as Chiaroscuro, taken from the Italian for Light and Dark.
Basically, you light across your subject in one direction, and here we lit the background in the reverse direction.
Ideally, the subject should go to black on the unlit side, and the same for the background. The subject’s shape, although black on the unlit side, is clearly defined because of the lit background.
This technique was used to very good effect to promote Batman in the new Batman Vs Superman film, along with earlier incarnations of the character.
Having said that, the definition has become somewhat diluted over the years, particularly after the advent of digital and especially in the last decade. I have seen an increasing reference to Chiaroscuro lighting which has shown a strongly lit subject, and the background allowed to fall to black. I have to assume they mean the contrast between subject and background, which doesn’t really hold true to the original concept.
Incidentally, with painting, which is where the term originated, it was a technique that brought together very strong contrasts of light and dark within an image to give an impression of shape and volume.
Rembrandt and Da Vinci used the technique frequently. Rembrandt later softened his style although the “Rembrandt portrait lighting” is still reminiscent of his earlier approach.
In photography, it developed to literally mean contrasting light and dark of the subject and background, again to provide impact and bring the subject forward. The current shift in interpretation is more towards the original definition held by the artists who painted with this technique, so the background has become less relevant to the technique, although I wanted to include the background here for emphasis.
Anyway, less of the history and more of the lighting…
I’d basically already gone through the use of accent lighting to help shape a face, enhancing texture, shape and form. This had been done using an accent light either side and a single key light. The image below is the behind the scenes (BTS) image from this section. (Thanks go to Joe Lord).
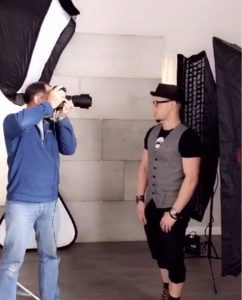
The accent lights consisted of Elinchrom ELB 400 action heads, each on their own power pack and connect to port B, firing at 4.0 through a gridded strip box. The key light was another ELB 400 action head with its own power pack connected to port B and firing at 3.5 through an 80×80 folding softbox.
Switching from the above mentioned setup to make it a Chiaroscuro setup is very simple and only involves the adjustment of one of the accent lights. I took the frame left accent light and moved it further back, before turning it to skim across the background. I also stepped to the left of the key light, making it more frame right and asking Martins to turn a little more towards me. This meant the key light was now basically lighting Martins’ left side of his face (frame right), whilst the frame right accent light was lighting along the left (frame right) of his jawbone, cheekbone and the rim of his hat. This allowed his right side (Frame left) to fall off to black. However, his outline is still strongly rendered as the background is strongly lit behind him, before falling off to back as it goes across towards frame right, and falling off towards black.
Very, very simple, but it does present an image with impact.
D4 200th sec ISO200 24-70mm @70mm f8
I provide training via Focal Point.


[…] of his face would fall to black, and his frame right would be well defined and lit. Basically, a Chiaroscuro lighting technique. Anyway, I had to take a couple of test shots to line up the point of falloff accurately behind […]