This is OCF (off camera flash) at it’s cheapest, along with the use of some basic rules and techniques.
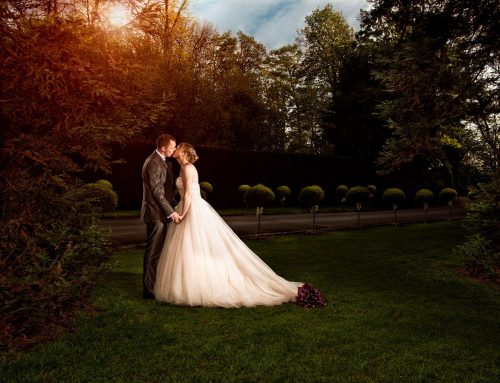
Seeing as sunsets tend to be in short supply in the UK, I try and make the most of any sunset that coincides with an event I’m photographing, and this particular wedding at Murrayshall House in Perth, Scotland, was one such event.
I wanted to enrich the basic colours in the sunset, and also bring out that lovely mauve colour that can be seen between the orange and the blue. As you are aware, ultimate under exposure will reduce all colours to black. However, on the journey towards that point, the colours get more saturated, so underexposing by a moderate amount will enrich the colours. I checked the ambient light levels, and it gave me 1/60th f4.5 ISO100, which is a pretty good starting point, bearing in mind all the light is coming at me directly from the sunset, and the landscape itself would be underexposed a fair amount even at those settings. I upped the shutter speed to 1/250th sec, thereby underexposing the scene as a whole by two stops (-2EV), including our bride and groom. There’s a tiny amount of shutter shadow creeping in along the bottom of the frame, but not enough to worry me. If it did, I would have turned the camera upside down, so as the ambient light at the top of the frame would have negated the curtain shadow. (The light from the speedlights would have been utilised at the “top” of the inverted frame).
To light my bride and groom, I placed an SB-900 camera right at head height and just out of frame, fitted with a stofen type dome and set to ½ power. I placed a Metz 54 MZ-3 camera left just out of frame, again with a stofen and set to ½ power. The power output would compensate for the underexposure I had dialled in for the scene as a whole, and would bring the bride and groom up to optimal exposure.
I set the camera’s white balance to fluorescent, which really brings out that magenta hue along the cloud line etc, and also helps enrich the blues and orange of the sunset. Of course, you end up with a very ill looking bride and groom! I gel’d the two speedlights with full window green, which meant my speedlight output would match the camera’s white balance for where the light falls.
One thing I found when post processing, most fluorescent settings are for a cool white fluo, and do not match the window green gel exactly. It’s not out by much, but enough to give a very slight green tint to the dress in shadows. This was rectified by setting the white point to the grooms collar which I knew was white, whereas the dress was an ivory colour. The added bonus was the deepening of the sunset colours when the white balance was set correctly. The landscape behind the bride and groom was brought up in post.
Now, about those stofens. I can hear the cries of “They don’t soften the light” blah blah blah. Very true, but that’s not why they were used. First of all, they act like a bare bulb, so they throw the light everywhere, and illuminate the ground in front of our subject far better. They make adding a gel a piece of cake! Simply take the stofen off, lay the gel across the front of the speedlight, and put the stofen back on. Lastly, and possibly more important for me, they provide a much better visual indicator that the speedlight has actually gone off. I’m usually behind the speedlights, and if I have a lot of speedlights in use, you can’t see if they’ve fired, unless you have a stofen fitted.
Wondering why the light doesn’t appear that harsh on our bride and groom? The two speedlights were at such an angle to fill in the shadow area of their counterpart, therefore reducing the harshness accordingly. You can derive the positions of the speedlights from the grooms shadow(s).
Incidentally, the speedlights were triggered using Yongnuo RF602 radio system.
Budget version:
Well, the only way to make this any more affordable would be to swap out the SB900 and Metz for two ultra cheap, manual only speedlights. I happened to use what came out the bag first.
Things to bear in mind:
Focusing can be an issue in low light, so a cheap led torch is worth it’s weight in gold. It costs next to nothing, weighs nowt and takes up no room in your kit bag. But, if your camera doesn’t have a focusing aid (D4 etc), you can look a right chump as you struggle to focus!
I provide training via Focal Point, and if you wish to see more examples of my wedding work, you can find it here.