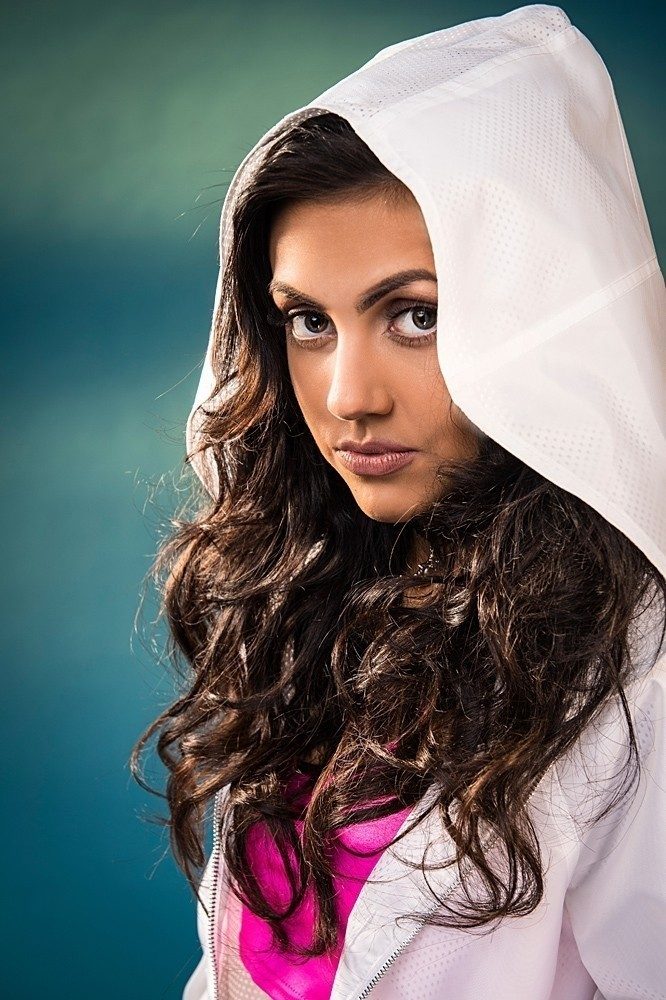
Photographing a product in a lifestyle setting can bring it’s own problems. We need to remember that the model is secondary to the product, and whilst they create the desirable lifestyle our client wishes to market to their potential clients, we need to bear in mind the key points of the product.
The above image is from a portfolio shoot for a sportswear designer, and there were a number of key points regarding the garments which needed to be kept in mind. The fabric is very light, soft, cool and breathable.
We already had several images in a gym environment, where the various garments were photographed, worn by the models as she exercised etc. The above image came from a second session at the studio, and were to be part of the images used on the e-commerce site.
The material of the jacket had a perforated “airtex” look to it, and I needed to ensure this would be visible in the image. I was very much aware of the fact that as the material was a brilliant white in colour, it would be far too easy to over light it, and possibly reduce the contrast, therefore making the perforations appear soft.
I placed an accent light frame left, and just beyond our model, at just above head height. This had two roles. First, it would highlight the perforations in the hood, where it could be seen just in front of her hair. Secondly, it would skim her forehead, the edge of her cheek, her nose and also her hair. Thus, providing shape and form to her face, and also creating the texture needed for her hair, which would otherwise appear flat. I used a 300Ws head firing through a 40cm Beauty Dish with a grid fitted, and firing at 1/8th power. The grid was required, so as to avoid flare.
A second accent light was placed frame right, again beyond the model and above her head height. This was another 300Ws head, and again it was firing through a gridded 40cm Beauty Dish. The light from this head was intended to skim along the outside of the hood,creating the shadows within the perforations that would then allow the texture to be seen. The light also skimmed across her hair in front of her left shoulder, creating the texture there too. The output was again at 1/8th.
Now, if you look carefully at her left cheek, you can just see some bleed through of the light from the hood, giving a soft white area. This was the most I could reduce the bleed though, without losing the texture of the hood.
I wanted the main light to have a soft quality, to basically give an overall light to our subject allowing the the stronger accent lights to create the required shapes and textures. I used a 150cm Octa on another 300Ws head, with the stand as high as possible, and immediately above me. The highlight can be seen at the top of our model’s eyes. The output was set to 1/16th.
Lastly, to just lift the shadows under our model’s eyebrows, I used a white reflector to bounce some light back up into her eyes, and also under her chin, although it barely registers there in this particular image.
I didn’t want a plain background. I wanted something to break up the light and add a little bit of interest, but not to the point it distracted from the main subject.
I found a large, clear plastic bag, and taped inside a few torn strips of paper. It was almost a Zebra striped pattern (if you sorta squinted at it!). The bag was the suspended in front of another 600Ws head that was fitted with a standard reflector and a grid. We had the bag approximately two feet away from the head, which meant the paper cast a shadow without being too harsh, and the grid fitted to the standard reflector kept the light from washing everywhere else. The head for the background was set to ¼ power, and placed frame right, to light across the background.
1/160th sec ISO200 f8
Budget version
This technique could be reproduced with speedlights, but the main challenges would be the modifiers. The two accent lights would need to be gridded due to being angled towards the camera. The main light could easily be fired through a shoot through umbrella, and the background speedlight could get away with a homemade snoot made from cardboard.
To get around the lower power output of the speedlights, you would need to increase the ISO to 400, and possibly need to open your aperture a little too.
I provide training via Focal Point.
