
Let me just say one thing first, and any serious photographer will subscribe to the same notion, actions are there to enhance good photographs. They can rarely rescue very bad exposures or techniques. It can certainly be done, but not usually with a “one click fixes all” approach, which a lot of folk seem to be desperately searching for.
That said, if you understand the philosophy and ideas behind the use of photoshop actions, you can make a mediocre photograph look good. Better yet, you can make a good photograph look outstanding!
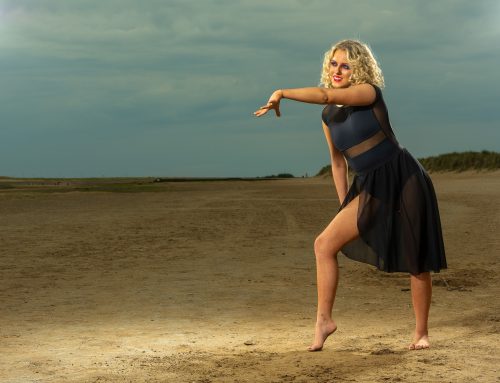
The above image was part of a shoot for a local stylist Rachel Mason. Some of you will remember Rachel from the Dare to be Different shoots I’ve covered previously. This particular shoot was for Rachel’s work for Loreal, and before anyone starts pointing fingers and muttering “rule of thirds…“, this particular image was shot for Rachel’s new website, with enough room for the menu system down the right hand side. The image to be sent to Loreal will have very little by way of post processing, particularly with regards to the hair and model, so a lot more attention has to be paid to the lighting.
Anyway, I digress. This particular post is to cover my post processing technique, in answer to a number of queries I’ve had recently. “How do you get the clouds so vivid?”, “How do you manage to get the subject to pop on an overcast day?”, “How do you get that vintage effect?” yadda, yadda, yadda.
Well, going back to my opening paragraph, I ensure the lighting, exposure and composition will all deliver what I particularly want with the image. However, the captured image can often be the starting point towards the final image I have in mind. Having said that, how do I get from captured image to finished item?
I have to say, I use actions a lot less now than I used to, and my thanks for that has to go to Stuart Little, and his one to one mentorship program. He literally took me from Lightroom non user, to fully competent in a very short period of time, and has effectively reduced my postprocessing time by at least 50%. A lot of time recovered!
So, what actions do I go to, when I do make use of them?. I still have actions I bought over five years ago, and still make regular use of them. The actions I now tend to gravitate towards are Stuart Little’s collection, such as the Vignette Maker, Creative Colour Lab and others. One of the newest action kits to be released is Stuart’s LPS Creative Essentials, and a superb kit it is too.
What makes it different from similar kits available? Well, it’s really quite sophisticated, insofar as the amount of control you have over the final look of the image. That said, you can easily do the “click-n-forget” thing, as the default finish is excellent. The above image was run through the vibrant action within the kit, which includes a slight gaussian blur – great for skin! I didn’t bother doing any further tweaking, this is exactly as it appeared post action.
Talking of sophistication, the kit includes a panel which allows very quick access to all the actions. A brilliant addition, as again, it’s completely geared towards cutting down your work time and getting the results you want as quickly as possible.
 Wondering what actions are actually within the kit?
 Honestly? there are some actions I really couldn’t manage without, such as Stu’s vignette actions. Although the LPS Creative Essentials has really only hit the market within the last week or so, I’m already starting to find I have the panel open as soon as I load Photoshop. That must tell you something.
There are plenty of example images and a couple of tutorial videos on the site, so go take a look. Worried about cost? Ha, I ain’t even going to mention it, because to be honest, it’s a no brainer! However, a word of warning. I believe you may soon realise the value and sophistication of Stu’s actions after you buy your first kit, and are likely to consider buying others. Have a good look around the store, because Stu currently has ALL his kits on special offer. And yes, that does include the latest release, LPS Creative Essentials.
The couple of images/screengrabs featured in this post have been robbed from Stu’s website. (with permission, I might add!)


Lovin your work Michael 🙂 Thanks for shout out on the LPS Creative Essentials
Stu
How could I not? Your actions are a major component in my work, and if my work is desirable by the likes of the Hilton and Macdonald hotel groups, then you and your actions have played a part in it.
Thanks Stu 🙂